I love smarthome stuff. Lights fading in at sunset, temperature readings in each room, a routine that plays NPR for the dog when we leave? Heck yeah.
But I cannot stand using a dozen apps, with interfaces ranging from “overdone” to “awkward” to “semi-translated barely cohesive spyware,” to manage the stuff. And I do not want to memorize very specific phrases to yell at Alexa. And, if possible, I do not want to feel like I’ve surrendered all privacy just to turn on the humidifier 30 minutes before I go to bed.
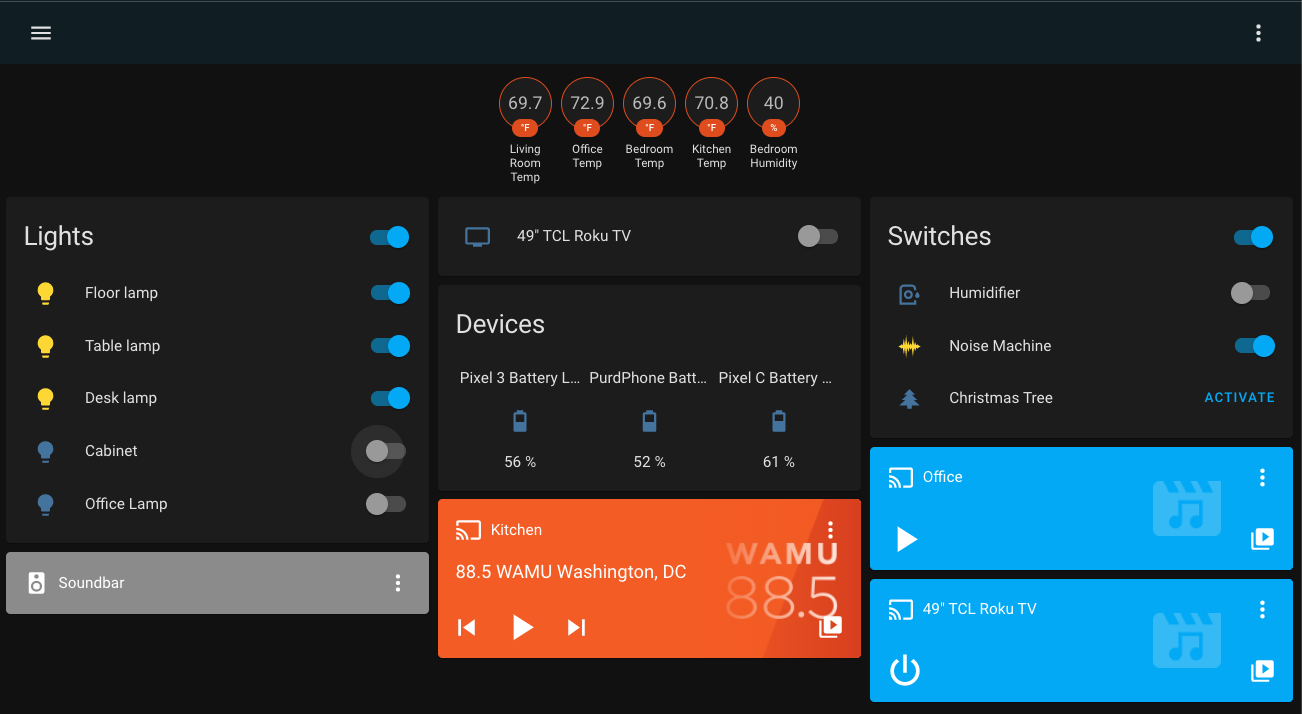
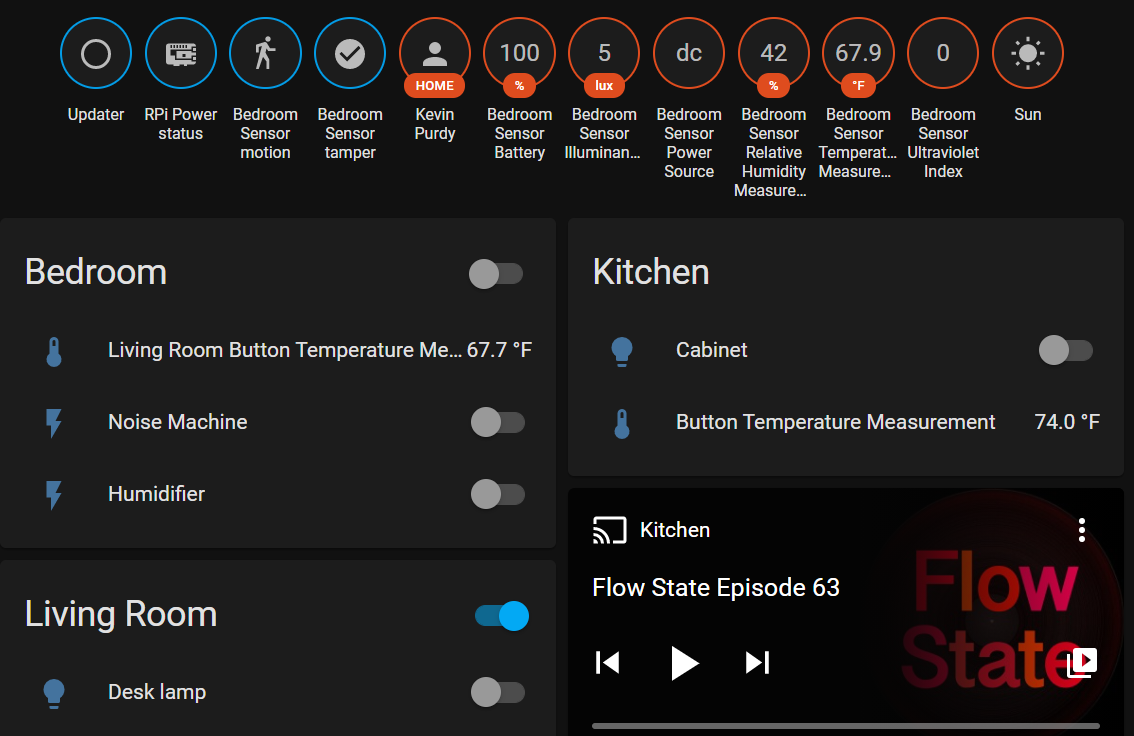
I found a solution. Yes, it involves a Raspberry Pi—okay, you got me. But you make the Raspberry Pi do this one thing, and you end up with a single place to control it all. You get a dashboard with all the switches and dials and readings. Like this one:
 Click for larger image
This is Home Assistant. If all you want is switches and monitors for all your stuff, in one app, it can do that. It does that better than Google Home, Alexa, or HomeKit, I think. As you can see above, I’ve got switches for my Hue lights and Wemo outlets, readings for my SmartThings sensors, and media controls for Sonos speakers, a soundbar, and the TV.
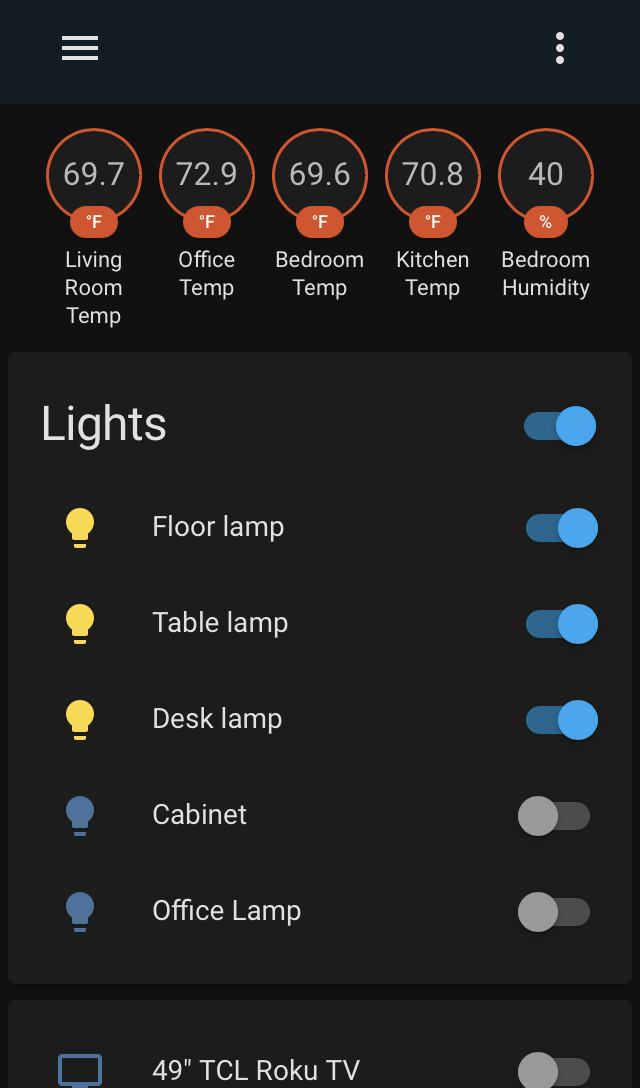
Looks good on a phone, too.
Oh, but you like to get deep, huh? Home Assistant’s got depth. My lights don’t just turn on in “the morning”—not even at “sunrise.” They turn on when the sun is at a specific angle over the horizon, based on civil dawn. My lights blink whenever someone’s battery level goes below 30 percent. My Home Assistant is also a DuckDNS client and a private WireGuard VPN host.
And I’m not even close to the deep end here. I’ve seen people in forums and subreddits using Home Assistant for presence detection, camera monitoring, having your speakers announce people’s arrival, and lots of other stuff. Do you get a little jolt when you see the phrase “YAML file” or “Zigbee”? Can you see Stack Overflow pages in your mind? You can get into Home Assistant, believe me.
I’ll walk through a basic setup in this post. You could also rely on the first two pages of the Getting Started guide. There are lots of web guides to Home Assistant; I’ve read many of them. But at the end of 2020, many of them also seem a bit dated. I hope I can provide some context, and encouragement.
Get Started
You might be asking yourself, “Is this one of those posts that’s full of terminal commands?” It is not. You will download an image, write it to a micro SD card, load that card into a Raspberry Pi, boot it up, and then use a browser to control everything from that point on.
The worst-case scenario is that you decide that Home Assistant isn’t worth it, so you’re stuck with a leftover Raspberry Pi. Sorry, that’s not really a punishment. Sorry that I tricked you into buying the world’s coolest video game emulator, network-wide ad blocker and privacy tool, personal VPN, and backup personal computer. Truly, I beg your forgiveness.
Let’s get into it.
Get a Pi and some stuff
As I write this, you can run Home Assistant on a Raspberry Pi 3B or 3B+, or a 4B. You could also use a Tinkerboard, Odroid, or Intel NUC. If you’re reading this long after fall 2020, or if you’re not sure about compatibility, check the installation page. Note that the easy, default installation takes over your whole Pi and does not give you a desktop to work with; everything is managed through a web broswer. There are ways of running Home Assistant in a Docker or installed on an already configured Raspberry Pi but I’m not getting into them here. I like the simplicity of a tiny device, doing one job, plugged into ethernet.
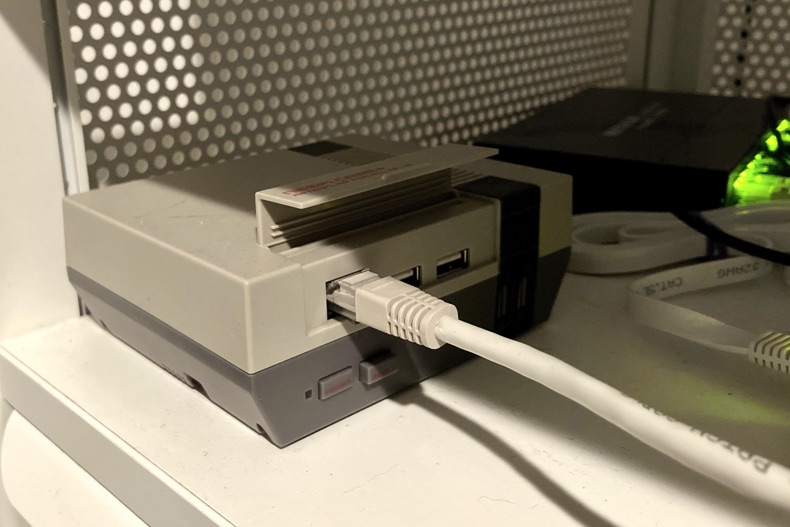 My Raspberry Pi 3B+, inside an NES-style case, force-fed ethernet.
If you’re buying a new Pi, you should probably buy a kit rather than just the board. You want a power supply and case at a minimum. Some kits come with heat sinks—nice, but not strictly necessary. You’ll need a micro SD card, too; some kits come with one, or you can buy one. Home Assistant says you should get one that is rated Application Class 2, one Pi enthusiast says, with charts, that it doesn’t really matter. I say, if you have a micro SD card already, use it, but go ahead and buy a good one if not.
You don’t need a USB keyboard and mouse, or even a micro-HDMI cable or dongle, though having those isn’t an awful idea for future Pi projects.
Oh, and, yes, an ethernet cable. A Home Assistant setup, and a Pi in general, works a lot easier if you can plug it into your network using an ethernet cord. For most people, this means setting it up near their home router. If you don’t have a working ethernet cord to plug in, you can follow step 4 on the Installation page to set up Wi-Fi. The setup isn’t too bad; it’s the chance for Wi-Fi hiccups that’s a pain.
Flash it
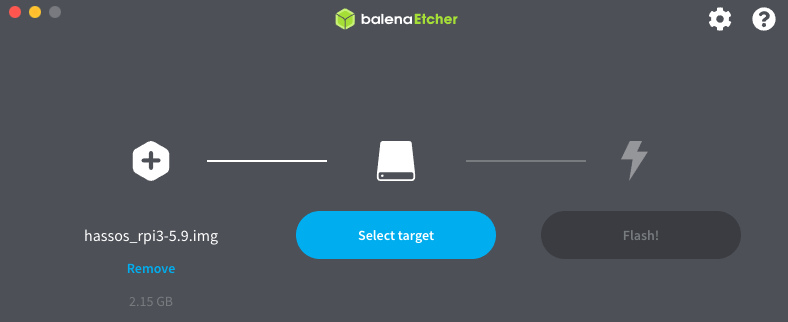
Balena Etcher is great software. Download it, install it, open it on any computer, Windows, Mac, or even Linux. Download the right Home Assistant image for your Pi. Connect your micro SD card to your computer. On the left-most side of Balena, pick the downloaded image. In the midddle section, choose the micro SD card. Hit the Flash button, and let Balena do its thing.
When you’ve got your card flashed, put it in the Pi. Plug the ethernet cable into the Pi (or put the USB stick with the Wi-Fi setup in it, or modify the SD card with the Wi-Fi details, detailed in step 3 here). Plug in the Pi’s power cable, and when you then plug it into the Pi, it will boot up (a little orange-red light near the power cord shows activity). Then, do nothing.
Set it up
Here’s where it might seem weird. On most Raspberry Pi setups, you want to have the Pi connected to a TV or monitor, and have a USB keyboard and mouse ready to walk through an initial setup. You wait until you see a big Raspberry on the screen. Home Assistant, once it installs and boots up, is managed through a browser. You don’t see anything on a TV or monitor.
Follow Home Assistant’s setup guide to access your Home Assistant through a browser. The guide at Pi My Life Up has more screenshots and some tricks to try if your browser doesn’t show a setup screen.
When you get to the screen showing the devices and services Home Assistant sees already, set up as many as you can then. It’s helpful to have some objects to work with when you’re first designing your panels.
Some stuff will set up without any help at all, some will require username/password authentication, and some devices might be a royal pain in the butt. My SmartThings stuff required the creation of a webhook inside Home Assistant. My Logi camera required that I ask the Logitech developers personally to open up an API spot for me, through a Google Form (!). I still haven’t heard back on that one.
Anyways! Set up what you can, hit “Finish” at the bottom of that page, and, BOOM, you’ve got your first dashboard, full of badges, cards, and entities inside each card.
The Basics: Control Your Smarthome Stuff
 Don’t edit this “Overview” dashboard
Here’s something confusing about Home Assistant: the first dashboard you see, “Overview,” is not the one you should mess with. “Overview” is a kind of omni-dashboard, updated by Home Assistant itself, showing you everything Home Assistant can work with and organize: rooms, scenes, devices, and weird little details about each thing. Rather than mess with Overview, you should create a new panel, make it the default, and have Overview to check in on as you make changes and add things.
Instead of trying to edit Overview, head down to “Configuration” in the lower part of the left-hand control panel, then scroll down to look for “Lovelace Dashboards.” You’ll see “Overview” as the only option here. Click the big “Add Dashboard” button in the lower-right corner. Give it a title, make sure “Show in sidebar” is toggled on at the bottom, and click “Create.” (Don’t worry about icons right now, we’ll get to that in a bit). Your new dashboard will look exactly like the Overview dashboard. Click the three overflow dots in the upper-right corner, choose “Edit dashboard.” You’ll get a warning that Home Assistant is currently maintaining this, but it’s fine. You’ll probably want to toggle the “Start with an empty dashboard” option at bottom, then click “Take control.”
Now you’ve got … nothing! Click the “+” button in the top bar to create your first “View.” You’ll probably only want one view, so just name this “Basic” or “Default” or whatever, then hit “Save.” Now you have an “Add Card” button on your otherwise blank dashboard. Click it.
It’s time to think about what you want to do with your Home Assistant setup. You can organize your stuff however you want. You could group all the lights, like I have, or you could group them by room, so it’s easy to turn off, say, all your living room lights, all the downstairs lights, etc. You could group all your temperature sensors with your thermostat control. It’s up to you.
You can add stuff either by choosing a pre-designed card, or pick the “entities” in your house and toss them in as a starting point. It may take some experimentation to figure out exactly which things you want in each card. Keep in mind that an “entity” is not a device, it’s one aspect of one device. Many things in a smarthome will have more than one entity attached to them. My TV has an entity that is just a power switch for the TV itself, as well as a media player entity that lets me control volume, pause playback, and such.
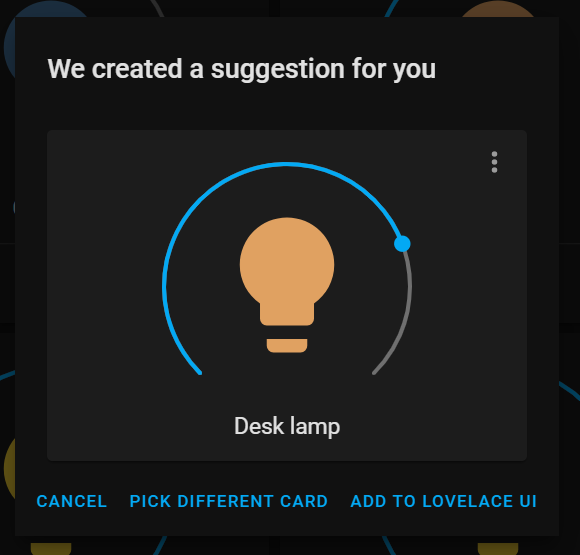
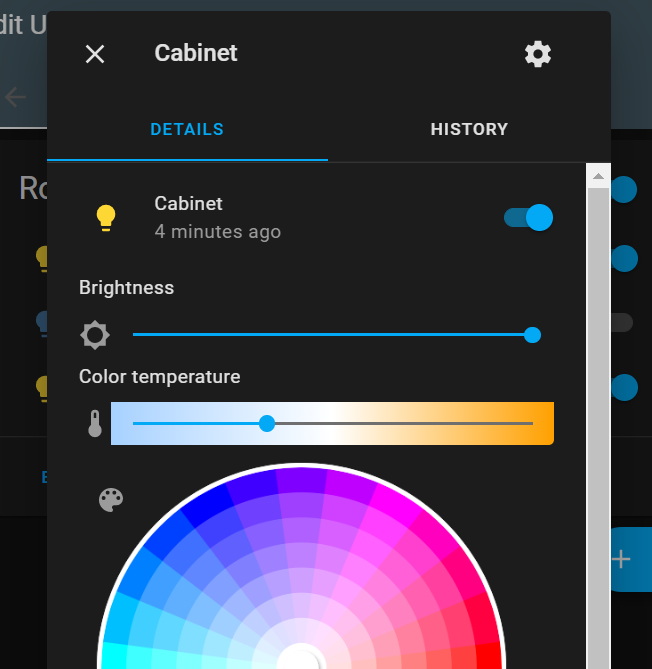
I think it’s easier to start off by searching for entities. Generally, if you want more detailed control of one thing, select it alone, then click “continue” to see a suggested card.
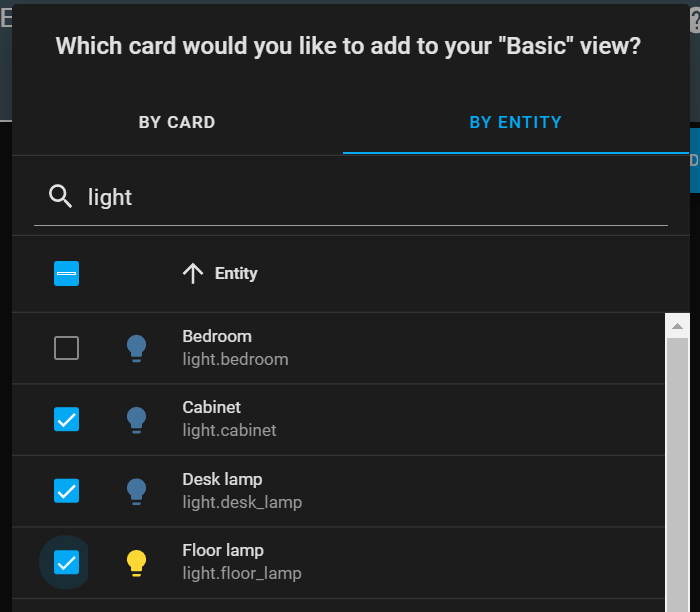
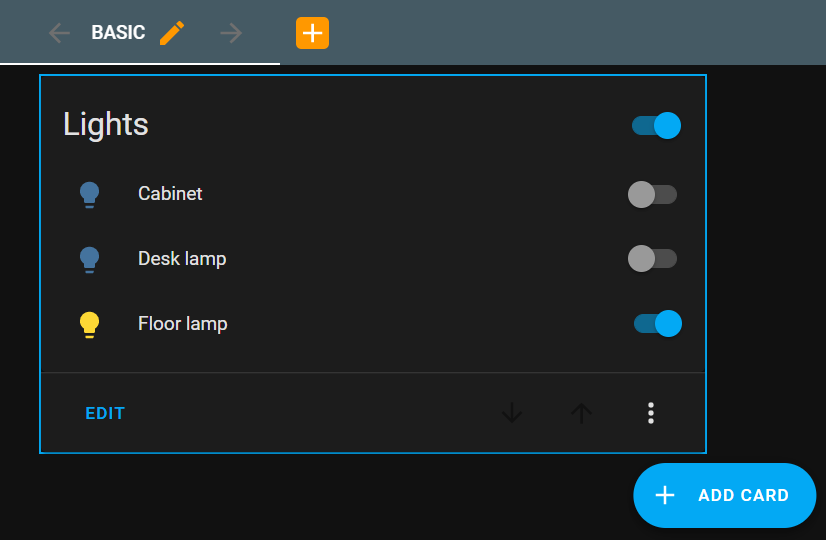
Or select a few different entities, and let Home Assistant create a multi-entity card. I like to enable the “Color icons based on state?” control for most cards.
It’s easy to add too many controls to your home screen. Keep in mind that you can tap any entity to get more detailed controls.
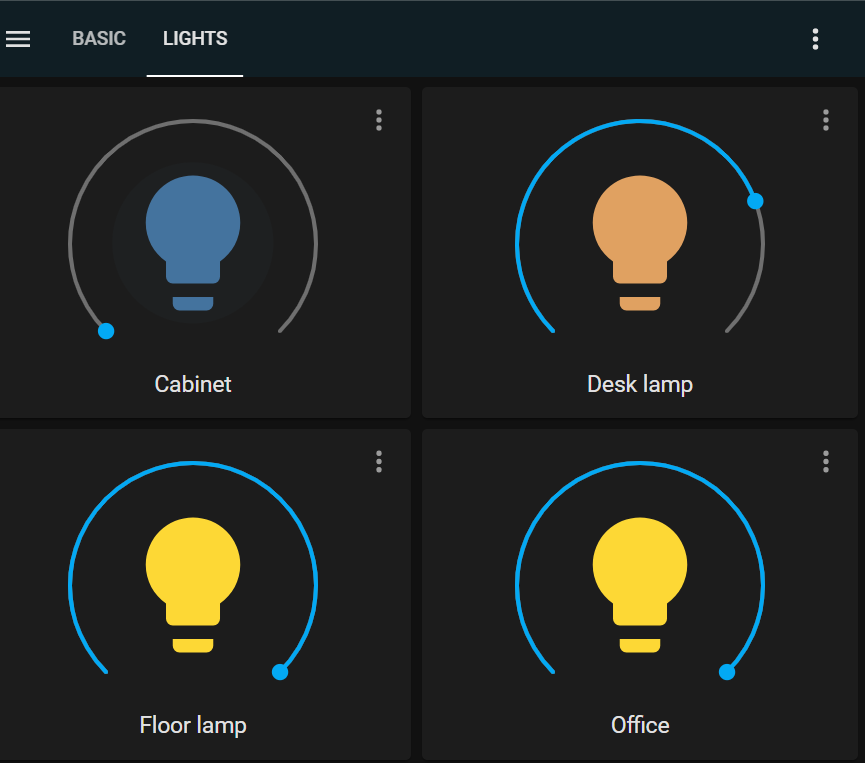
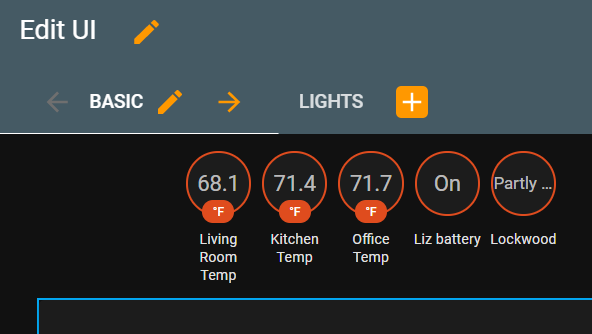
You can also create more specific views. For instance, I can create another view, “Lights,” that shows the dimming controls and big on/off buttons for each one.
You’ve got the hang of it now. You can always come back to this editor screen and add or remove entities from cards, change card types, and, as you’ll see below, fine-tune the look and feel of everything.
Icons and badges
For most entities, Home Assistant has a default icon that makes sense and looks spiffy. Lights show light bulbs, switches have little lightning/power bolts, battery levels show batteries. But you might want to customize them, to better know at a glance which is which, or just scratch your customization itch.
Let’s fix up this card I have for Tile Bluetooth trackers. By default, every Tile icon is a square made up of four smaller tiles (clever!). But let’s say I have one on my keys, and one in my wallet, so I want a quick-glance distinction between them. Click on the entity you want to change, then click the gear icon in the upper-right corner of the detailed view that pops up.
There’s an “Icon” field, but it’s … text? Yes. Home Assistant has you choose universal icons from the Material Design project. Head to that site, choose the “Cheatsheet” option on the top panel, and Control/Command-F search the page for the icon you want. I liked mdi-wallet on there, for example. In Home Assistant entities, you replace the - with a colon, :. So I enter mdi:wallet in the Icon field, and it should show up just after you type it in and hit enter.
![]()
Besides cards, you can also set up a shelf of permanent badges at the top of your dashboard. You can see them in the “Overview” dashboard: a whole bunch of little circular tiles at the top of the window. To add them to your own dashboard, navigate to it, click the three-dot menu, choose “Edit Dashboard.” Click the pencil icon next to the view you want to edit. One of the sub-sections is “Badges.” That’s what those text-only circles are, Badges.
The thing to keep in mind is that you can’t manipulate any of these Badges. You can click them for more detail; that’s helpful for temperatures, battery levels, statuses, or things where you want to click to see more detail.
Once you’ve got your dashboard set up and looking good, you’ll want to make it the default dashboard you see when you log into Home Assistant, or open the phone app. In the sidebar, look for the bottom-most option, with your name or username on it. Click it, and in the “Dashboard” section, click and change the default from Overview to your custom dashboard. While you’re in this section, you can also choose a dark or light theme, tweak the color scheme, and make other changes.
If you stopped here, you’d have an efficient little server and webapp that lets you control all your smarthome stuff at once, from your local network, using a no-nonsense panel you designed yourself. Not bad!
Me, I did not stop there.
What Else You Can Do with Home Assistant
For the built-in things you can explore with Home Assistant—Scenes, Routines, Areas, Scripts, Tags, People tracking—you should rely on the official Home Assistant documentation. It’s good.
I’m going to briefly note here the stuff that I’ve packed into my own Home Assistant, and some tips on how I got them working.
Install phone/tablet apps
The iOS and Android apps for Home Assistant aren’t just a quick way to get to your web panel, though they are that, too. They’re also a way for Home Assistant to send you notifications about smarthome things. You can even make those notifications actionable.
My favorite part, though, is that, if you grant the permissions, Home Assistant can use the data from your phone. I can’t even fit all the things your phone can report back to Home Assistant in one screenshot, but here’s a few highlights (with some variance between iPhones and Android):
- Battery level (%), health, state (charging, not charging), charging type (wireless/wired)
- Wi-Fi network and LTE connection
- Floors ascended/descended, steps walked, and other fitness stats
- Location, last update
Install File Editor, Samba, and other add-ons
If you’re going to dive deeper into Home Assistant, you’ll need to edit some config files. Head into the Supervisor menu in the left-hand sidebar. Click the “Add-on Store” heading (or the storefront-style icon). Look or search for “File editor,” then click and follow through to add it to Home Assistant. After it’s done installing, you might want to enable the “Show in sidebar” option on its “Info” page.
You can also install a Samba add-on, which would (theoretically) allow other computers on your network to find your Home Assistant and browse or edit its files. Samba is a finicky protocol, but it’s there if you want it. If you know what SSH is, and can securely set up access for yourself, that’s an easy add-on, too.
Move your logs (and back up your system)
Home Assistant is a server. As such, it logs everything that is happening, so that you might spot problems and tweak performance. That’s fine, but most people run their Home Assistant from a micro SD card inside a Raspberry Pi. Micro SD cards die faster with frequent writing.
I can’t say for certain whether this will matter for you. But once you have your Home Assistant set up, it’s not a bad idea to slow down the card burn. You have a few options:
- Use a USB stick for your Assistant’s storage. This rather intenstive post explains how
- Buy a class A1 or A2 micro SD card, since they are rated to last for years with gazillions of writes.
- Do what I did: cut down what is logged, shorten the time logs are kept, and move your logs to the system’s memory. Since your Assistant is always-on, you can still access your logs, and they won’t impact your system RAM much.
You’ll want to install the File Editor add-on mentioned in the last section to monkey with configuration.yaml. Before you do that, you should must take a snapshot backup. It’s a couple clicks to recreate all the connections and settings inside your Assistant and download it from a browser. Do it before any notable monkeying around, running updates, and every so often, just because.
In your Home Assistant sidebar, click Supervisor, then the “Snapshots” tab at the top. Give your snapshot a name (maybe with a date, too, like 2020-12-29-Home-Assistant), password protect it if you want, and make it. Click on any of your snapshots in the gallery on this page, download them, put them somewhere safe.
Okay, now that you’ve got a fallback in case a typo in a config file ruins everything (kidding! kinda!), open up that File Editor from the sidebar (or Supervisor->Add-on Store, File Editor, Open Web UI if it’s not there). Click the file icon in the upper-left corner when the editor opens. Click configuration.yaml from the list.
In your configuration file, there should be a recorder: section header. Underneath that header, but indented two spaces, add db_url: 'sqlite:///:memory:', as suggested by this helpful Reddit commenter. Later in that same thread, he suggests purging your log files after 3 days’ time, and excluding the really esoteric stuff Home Assistant logs, like when the position of the sun changes. So here’s taylen123’s example recorder segment in configuration.yaml, pasted from their comment:
recorder:
  db_url: 'sqlite:///:memory:'
  purge_keep_days: 3
  exclude:
    domains:
      - automations
      - weblink
      - updater
    entities:
      - sun.sun
      - sensor.last_boot
      - sensor.date
      - weather.home
      - weather.dark_sky
Save the file when you’re done (the red “disk” button in the upper-right corner). Make sure you’ve got your snapshot backup downloaded, then reboot your Home Assistant (Supervisor->System->Host System->Reboot). If it works … nothing changes, really. You might check on your System Metrics every so often to make sure your RAM usage is okay. On my Pi 3B+ with 2 GB RAM, I’ve rarely used more than 24% memory.
Set Up External Access
You can use Home Assistant when you’re on your home network, and that’s fine. You might not need access to your server when you’re away from home, or you might have another solution, like a VPN (which is easy to install with Wireguard). If so, you never need to dive into this murky realm.
But if you do need to open up Home Assistant, whether for access or to enable a webhook or something else, you want it to be secure. The easiest way to securely access Home Assistant from any device, anywhere, is to pay $5 per month to Nabu Casa. Nabu Casa is a sponsor of Home Assistant, they’re very serious about security and data privacy, and their service makes enabling remote access and all kinds of hardware access very easy. It also unlocks some cool text-to-speech stuff.
Like it says on their site, using Nabu Casa means:
You don’t have to deal with dynamic DNS, SSL certificates or opening ports on your router.
But what if, like me, you hate yourself, you value victory over inanimate objects more than your free time, and you “love” a “challenge”? Then let’s get into it!
My setup was probably different than yours: router, ISP, home network setup, etc. But the broad tasks for enabling remote access are:
- Give your Home Assistant/Raspberry Pi a static IP address on your home network.
- Get a free DuckDNS account.
- Install the DuckDNS add-on in Home Assistant and configure it (I didn’t need to do the port 80 configuration suggested by this guide, but your results may vary).
- Open a port on your router and forward it to Home Assistant’s static address and the Home Assistant port (8123).
- Connect to Home Assistant now through that DuckDNS URL and whatever port you forwarded to HA:
something.duckdns.org:1234or whatnot.
The best advice I can give on this process is to avoid any rabbit holes you see about connecting to Home Assistant securely on both your internal and external network. Once you set up an external URL with a valid certificate, Home Assistant cannot serve up a valid certificate for your local network connection. You might find some posts suggesting a setup using the nginx add-on to create an SSL proxy. But, listen, you just wanted to control your lights and thermostat, right? That way lies madness.
Just bookmark and connect to your Home Assistant through your DuckDNS address, and then donate to DuckDNS and Let’s Encrypt for making the web secure for everyone, including you and your weird home automation project.
You might want to harden your Home Assistant security if you’re opening it up to outside access. I liked Kiril Peyanski’s suggested two-line addition to configuration.yaml, which locks out IP addresses after 5 incorrect password attempts. It’s also a good idea to turn on multi-factor authentication for log-ins. Home Assistant itself might not be a prime hacker/griefer target, but it’s an always-on computer attached to your network, so lock it down.
By all means, let me know if you:
- find any issues with my Home Assistant advice
- spot any typos or dead links
- have some cool Home Assistant stuff to show off
I hope you enjoy this tiny computer project at least half as much as I have.